Design a New Game – Design Mode
If you want to create a new game from scratch, you can select the option Design a game from the Home Page. By making this selection, you enter ChoiCo’s design mode. The design mode consists of four separate tabs that represent the different elements of the game you will be designing.
These tabs are:
-
Game Interface
This is where you design your game interface. This means you can edit the scene, add and modify points on it and set the consequences of each point. -
Initial Settings
This is where you set the initial state of the game (e.g. starting values of fields). -
Game Rules
In this tab, you define the rules according to which the game will work (e.g. warning messages). -
End Rules
In this tab, you define the conditions that will end the game (e.g. if one or more fields get an extreme value).
In tabs 2, 3 and 4, the design is realized by tile commands (Blockly Programming Language). The functions of each tab are described below in detail.
1st Tab - Game Interface
In this tab you can find:
-
the Scene of the game in which there is the background (by default a city map) and
-
an empty Database, as shown below
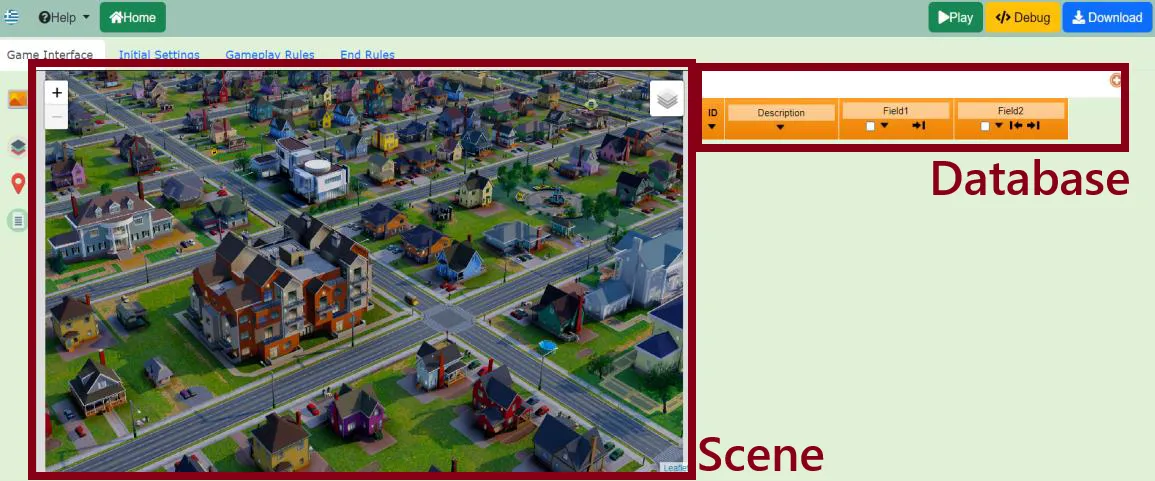 Figure 14: Game in Design Mode – Game Interface Tab
Scene Editing
The scene simulates the theme of the game and it is the main element the player interacts with while making choices.
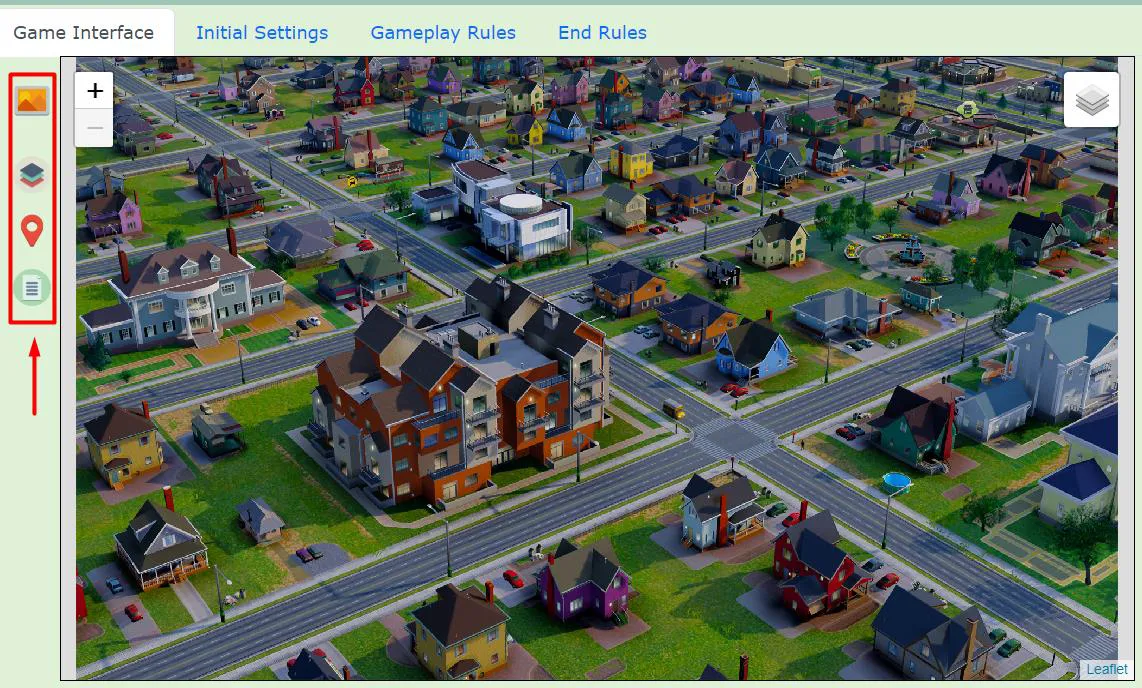 Figure 15: Game Interface Toolbar
Change Scene Background
If you want to change the background of the scene, click on ![]() in the toolbar to the left of the scene. Then, you can select any image that
is stored on your device and click OK. The image will be automatically added
and adjusted as the background of the scene.
in the toolbar to the left of the scene. Then, you can select any image that
is stored on your device and click OK. The image will be automatically added
and adjusted as the background of the scene.
Add & Edit Layers
A game scene in ChoiCo can consist of several layers. All games have an initial layer called “Main”. However, there is the possibility to create new layers which can act as different “regions” of a game.
Every layer has the following characteristics:
- A name
- Some points
- A background
Layers can be managed by clicking on the scene toolbox button which opens the window below. This window displays a list of all available game layers, as well as the option to add a new layer.
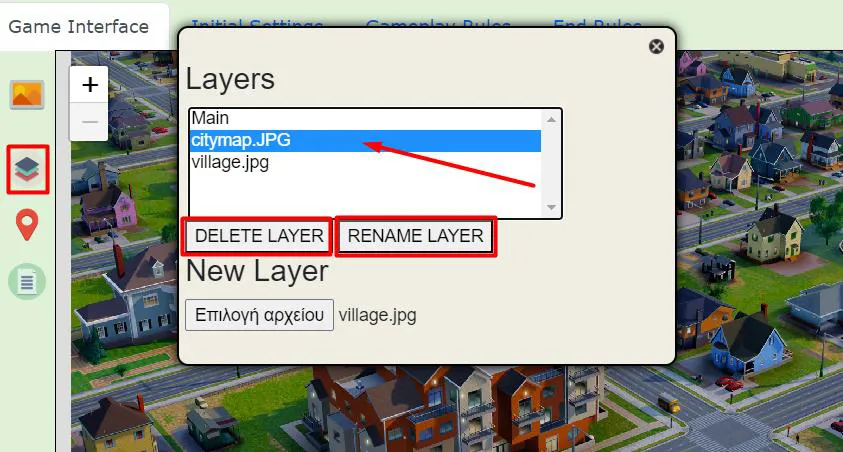 Figure 16: Manage Game Layers
Add new layer
To add a new layer, click on Select File and select an image from your computer which will be the background of the new layer. The new layer will be automatically added to the list, which will have -as its name- the name of the file of the image you loaded (e.g. citymap.jpg). This layer will not have any points.
Change layer name
If you want to change the name of a layer, select it from the list of layers and press Rename Layer. Then, type the new name you want. The “Main” layer cannot be renamed.
Delete layer
In order to delete a layer, select it from the list of layers and press Delete Layer. This action will delete the layer along with all its points.
Switch between layers
Toggling between the available game layers in the design mode can be done via the button in the top right corner of the scene. This way you can change the background and add points to each layer individually.
 Figure 17: Switching layers
Add & Modify Points on the Scene
To add new points to the scene of any layer, click on ![]() from the toolbar on the left of the scene (Figure 15). By selecting this icon,
you activate the “insert points” function and by clicking anywhere in the scene
you can add a new point. After you have finished inserting the points, you need
to reclick on
from the toolbar on the left of the scene (Figure 15). By selecting this icon,
you activate the “insert points” function and by clicking anywhere in the scene
you can add a new point. After you have finished inserting the points, you need
to reclick on ![]() the to return to the original state of the scene.
the to return to the original state of the scene.
To delete a point you should right-click on it and select Delete point.
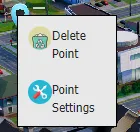 Figure 18: Delete point from the scene
You can move a point in the same scene by clicking on it and dragging it to a new position within the scene. To move it to a different layer, right-click on it and select Point Settings. In the window that appears there is a list of available layers and the layer the point belongs to is selected. You can select another layer and click OK. The point will automatically be moved to the selected layer.
Game Instructions
By clicking on ![]() ,
a pop-up window appears where you can write a text for the players,
related to the instructions concerning the game.
,
a pop-up window appears where you can write a text for the players,
related to the instructions concerning the game.
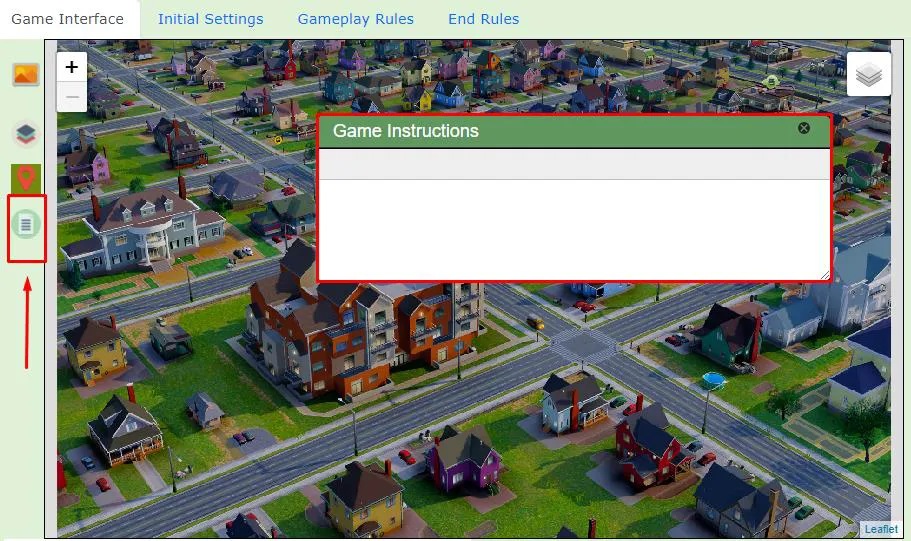 Figure 20: Writing Game Instructions
Database
When you add a new point on the scene, the system automatically inserts a new line into the Database. This line represents that point and allows you to change its properties. All points have common attributes, which correspond to the columns in the table.
By default, there are 4 fields.: ID, Description, Field1, Field2.
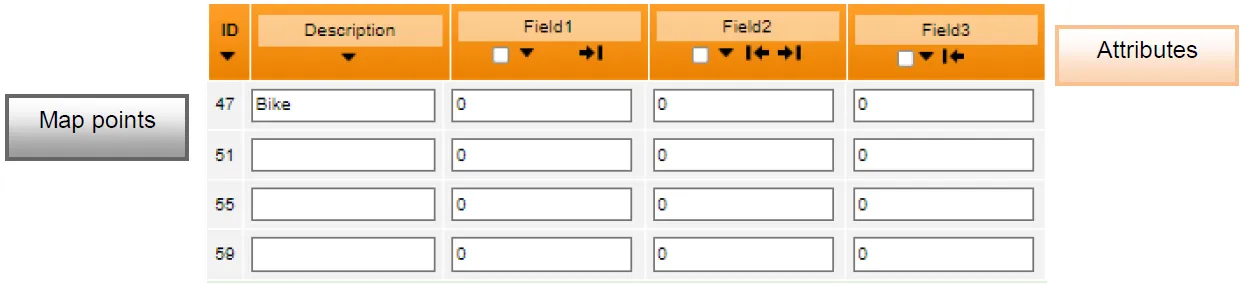 Figure 21: Database
The ID is a unique number for each point and cannot be deleted or modified. The Description field refers to the name of the point, which will also be displayed on the Scene.
The names of the other attributes (Field1, Field2…) can be changed.
Adding/Removing new attribute
To add a new attribute for the game points, you need to click on the board’s ![]() button. The new attribute will be added as a new column in the Table. To change
the name of the property, just click on its name.
button. The new attribute will be added as a new column in the Table. To change
the name of the property, just click on its name.
 Figure 22: How to add a new attribute
To delete an attribute, first select its column by clicking on the small box next to
its name. Next, click on ![]() , on top of the table. ID and Description cannot be deleted.
, on top of the table. ID and Description cannot be deleted.
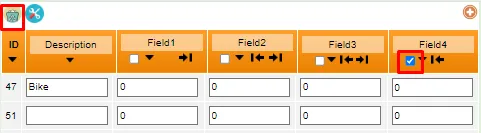 Figure 23: How to delete an attribute
How to change the type of a property
Select the property you wish to change and then click on ![]() .
.
Each property is identified by a data type. The data type determines how the property will be displayed and what the “function” of the property will be. The available types are as follows:
-
Number: accepts only numeric values
-
Text: Accepts alphanumeric characters (text + numbers)
-
Image: Allows you to add an image from your device by pressing the Choose button
-
Date: Accepts values in
dd/mm/yyyyformat. -
Link: accepts a connection with an external source, e.g. YouTube video, by pasting the corresponding URL.
-
Formula: It allows you to create mathematical relationships between the properties of fields.
Formulas examples:
- By writing
rand(0,10)in the field of a property, a random value from 0 to 10 will appear in the corresponding property every time the player selects that point. - The value of an attribute can be written in relation to the
value of another property, e.g. if a game has the attributes
Money and Fun, the Fun field can contain the formula:
money*2, so the value of the variable Money will be used.
- By writing
You can see the available mathematical Formulas in detail here
The default type for each property is Number. To change the type, select the
property from the box next to its name and then click on ![]() ,
located at the top left of the table. In the pop-up window you can select one
of the above types. The type of the “Description” property is set to “Text” and
cannot be changed.
,
located at the top left of the table. In the pop-up window you can select one
of the above types. The type of the “Description” property is set to “Text” and
cannot be changed.
How to assign values to the attributes of each point
You can set the attribute values for each point by clicking on the corresponding white box in the row of each point. Depending on the type of attribute there may be restrictions on the values. For example, attributes of Number type accept only numeric values.
2nd tab - Initial Settings
After setting the fields and their properties in the first tab, you can then set the initial values of the numeric fields in the Initial settings tab, where you define how the game starts. There you’ll find a Block-based programming area. On the left, there’s a sidebar with the available blocks, which you can drag into the workspace on the right and start creating the game.
The available Blocks here are divided into 3 different categories depending on their functionalities which are:
- Initialize
- Game Actions
- Map Actions
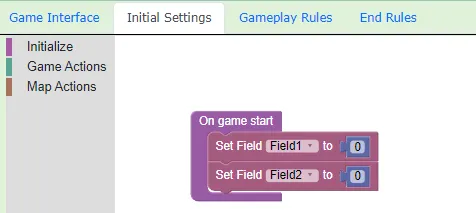 Figure 25: Sidebar and workspace of the “Initial settings” tab
When you access this tab for the first time, only two initialization property blocks that have been set as an example will be displayed. To add initial values, select the
Set Field … to …
block from the sidebar. and drag it into
On game start.
Then, by clicking on the property name from the drop-down list, you select the
property you want to initialize. The default value given to all properties is 0.
You can change this value by clicking inside the blue box containing the numeric
value of the property.
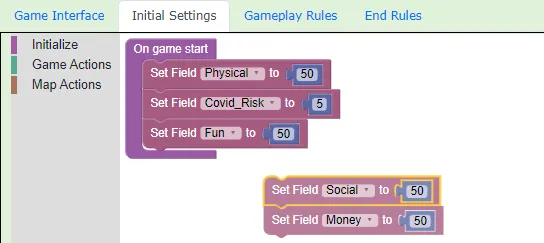 Figure 26: Example of initial setup code - Covid Survival game
For a more detailed description of these blocks see:
Initialize block
Game Actions block
Map Actions block
3rd Tab - Gameplay Rules
In the 3rd tab you can program the rules for the game that will be triggered every time the player selects a point. The code programmed here will be executed every time the player selects a point and the result will be displayed automatically. Similar to the 2nd tab, this tab contains a workspace for Block programming and a sidebar with available blocks.
The available Blocks here are divided into four different categories depending on their functionality, which can be:
- Conditionals
- Variables
- Math
- Game Actions
- Map Actions
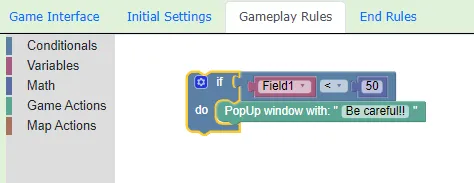 Figure 27: Example of available commands on the Gameplay tab
The figure below shows an example of rules programmed in the Gameplay Rules tab. In this
example, after the player makes a selection, the game will check if Covid⚹Risk
is greater than or equal to 70 and, if it is, a pop-up window will appear with
the message “You got close to a confirmed Covid case. Please be careful!!!!!”. After
that, it will check if Money is less than or equal to 15 and if it is, it will
display the message “You’re running out of money…”.
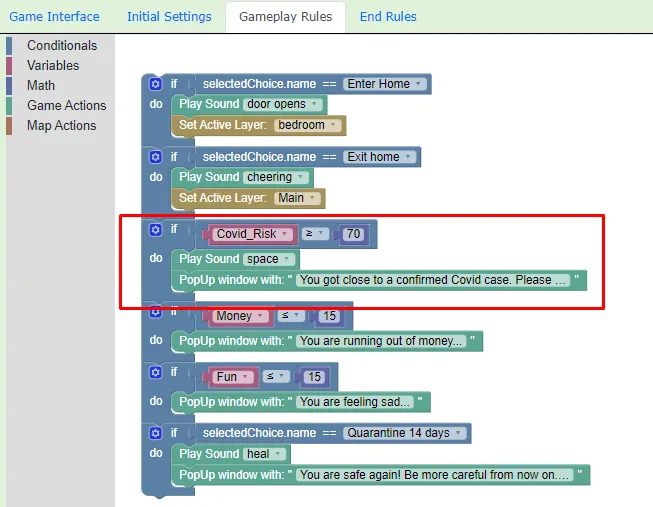 Figure 28: Example of gameplay rules code - Covid Survival Game
In the example below, the code checks if the selected field is Enter Home, if selectedChoice.name ==
and if it is, sets the active layer to Enter Homebedroom.
In addition, the code checks if Exit home
is selected and if it is, the player is moved back to the main layer.
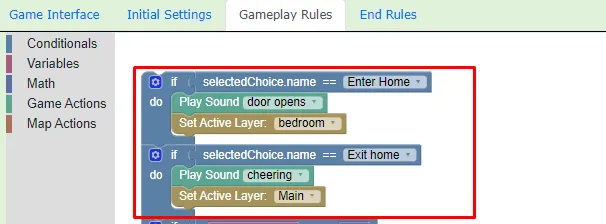 Figure 29: Example of gameplay rules code - Covid Survival Game
For a more detailed description of these blocks see:
Conditions block
Variables block
Math block
4th Tab - End rules
In the 4th tab you can program the rules for ending the game. The code programmed here will be executed every time the player selects a point, after the control conditions code, and the result will be displayed automatically. Similar to Tab 2 and Tab 3, this tab contains a workspace for Block programming and a sidebar with available Blocks.
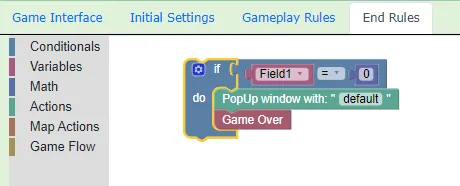 Figure 30: Available commands on the End Rules tab
The Blocks available here are divided into five different categories depending on their functionality:
- Conditionals
- Variables
- Maths
- Game & Map Actions
- Game Flow
The figure below shows an example of termination rules programmed in the 4th tab. Each
time the player makes a choice, the code first checks if his physical state is lower
than 5. If it is, a pop-up window appears with the message
“Your physical state is really bad!…” and the game ends.
After, it checks if Covid*Risk
is above 90 and if so, a pop-up window appears with the message
“You need to work out…” and the game ends.
Then checks if Covid_Risk is 90 and if so,
a pop-up window appears with the message”You’ve got Covid! Game is over” and the game ends.
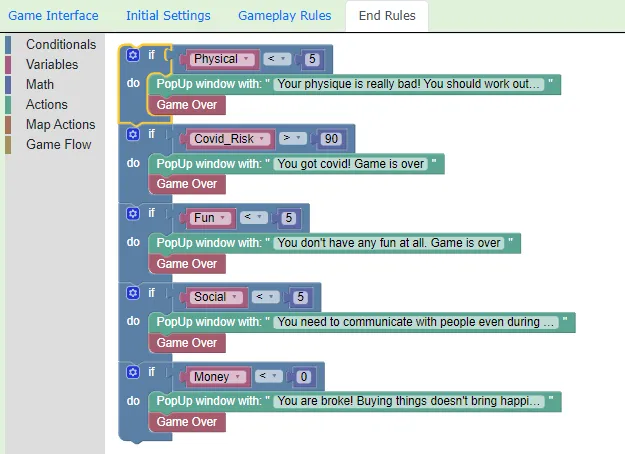 Figure 31: Example of programming on the End Rules tab
More information about managing the available blocks can be found at Programming with Blocks
Test & Save the game
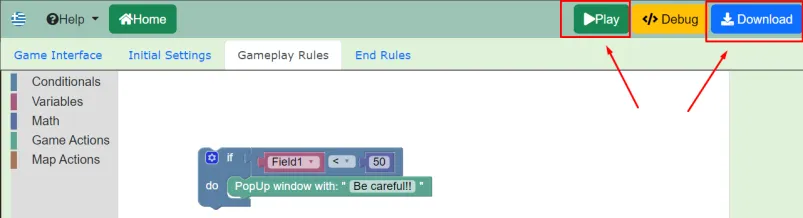 Figure 32: Test & Save Game
Once you have completed the game design, you can either:
- play it directly, by clicking Play (figure above), without saving it, continuing if you wish to edit it afterwards.
- save it on your device as a file with a
.choicoformat by clicking Save. Before downloading, through a pop-up window, you are asked to give a name to the game you just designed (figure below).
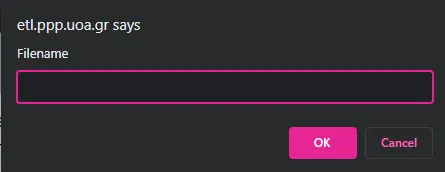 Figure 33: New or modified game naming pop-up window
Button actions in Design Mode
| Button | Action |
|---|---|
| Play the game, after modifications. | |
| Save a new or modified game. | |
| Display a pop-up window with a report of programming errors that may have been made in the code. |